python 구글 드라이브 파일 업로드 기능 개발
ChatGPT 요약
Google Drive에 파일을 업로드하는 과정을 총 6단계로 나누어 설명하려고 합니다.
- 로직 구현을 위한 파일 및 폴더 생성
- Google Cloud 프로젝트 생성 및 API 활성화
- 사용자 인증 정보 설정
- Google Drive에 데이터 저장용 폴더 생성
- 로직 구현을 위한 의존성 라이브러리 설치 및 코드 구현
- 코드 실행
1. 로직 구현을 위한 파일 및 폴더 생성
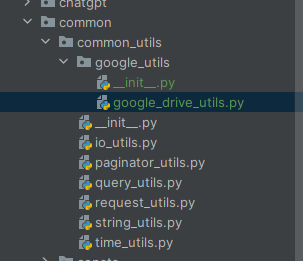
common/common_utils 패키지 내부에 google_utils를 생성하고, google_drive_utils.py 파일을 추가했습니다.
2. Google Cloud 프로젝트 생성 및 API 활성화
https://cloud.google.com/?hl=ko
(Google Drive API Docs: https://developers.google.com/drive/api/reference/rest/v3?apix=true&hl=ko)
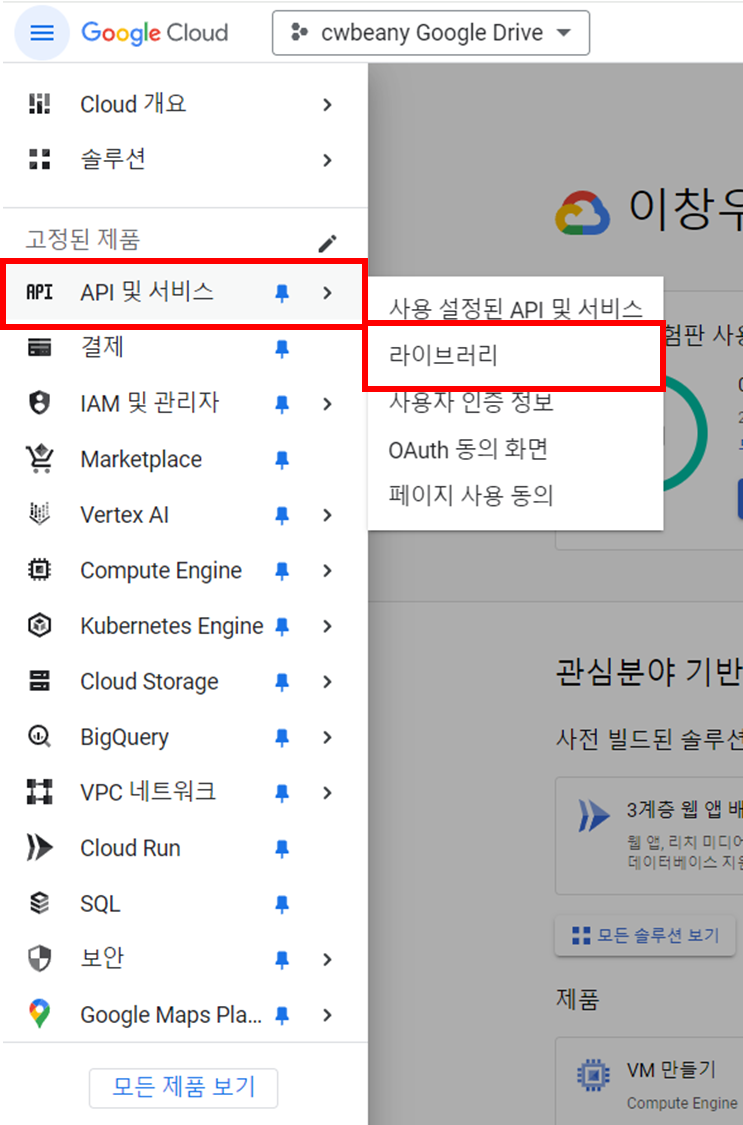
API 및 서비스 메뉴에서 라이브러리로 접근합니다.
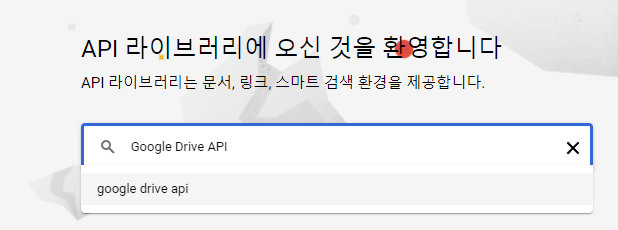
Google Drive API를 검색합니다.
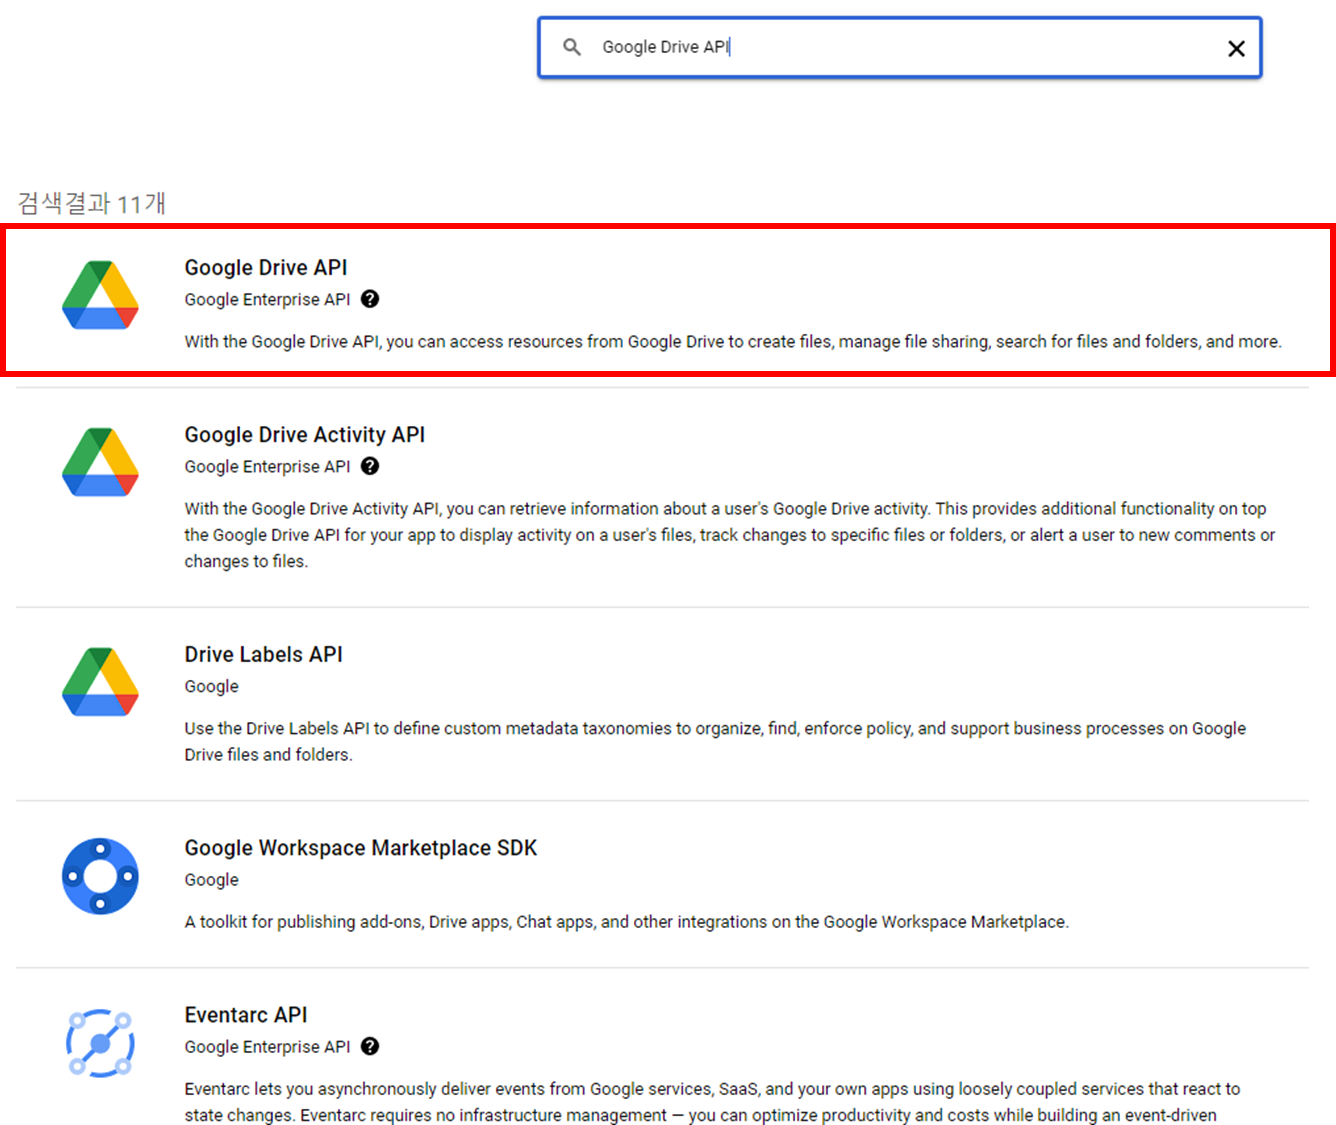
Google Drive API 를 선택합니다.
사용 클릭~!
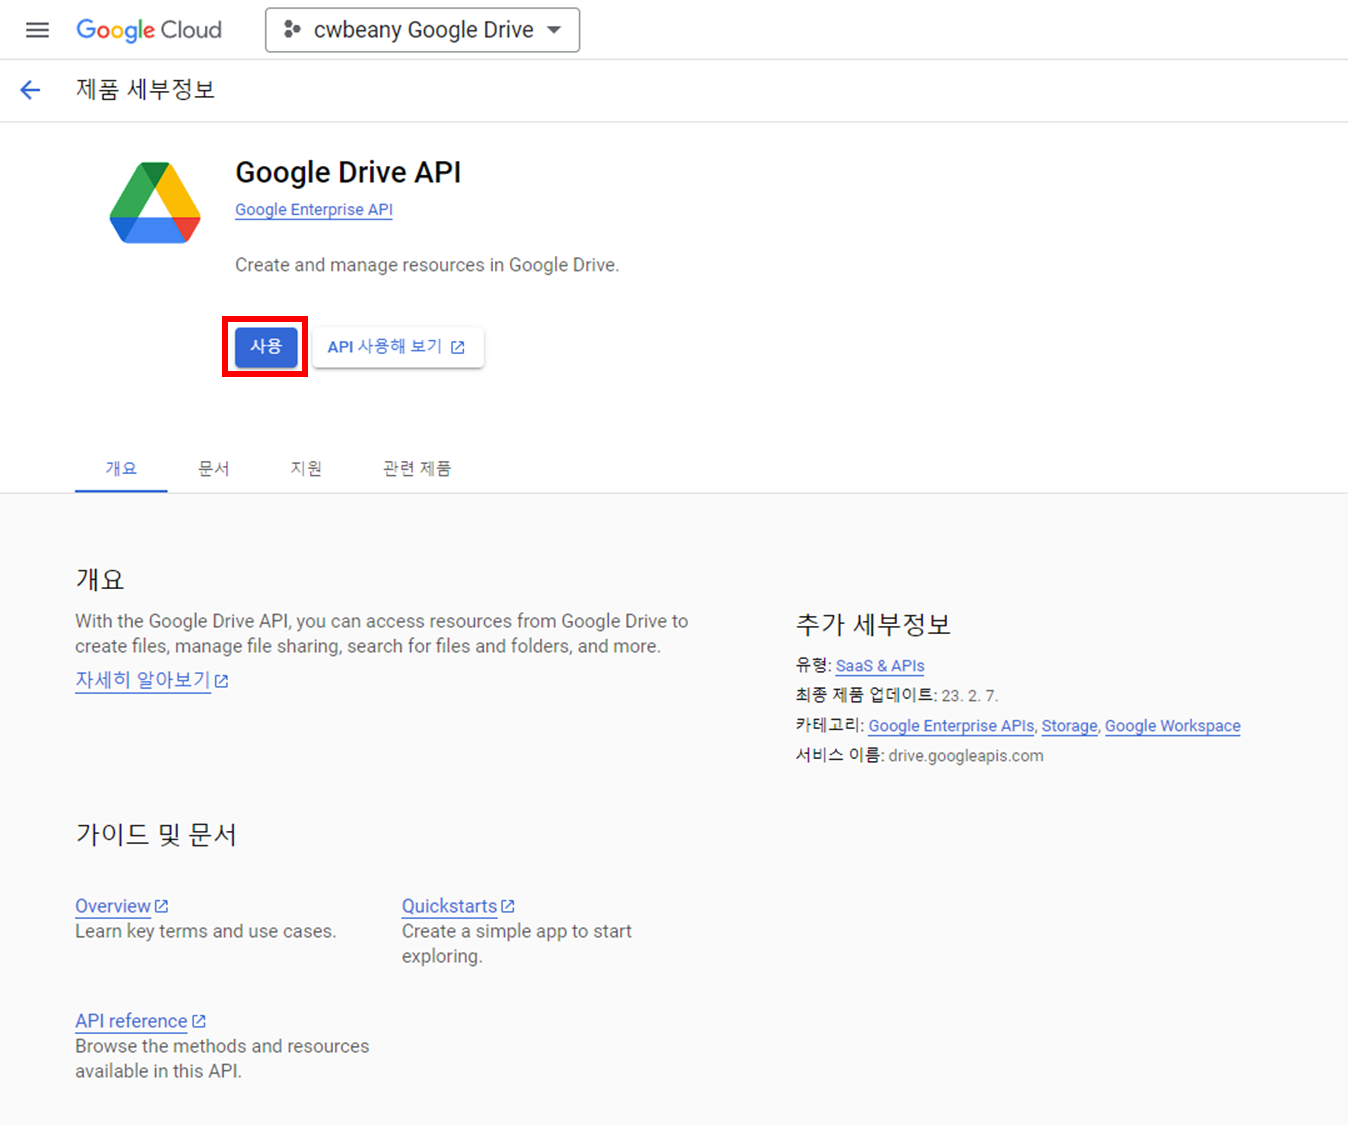
잠시 기다리면 설정이 완료됩니다~
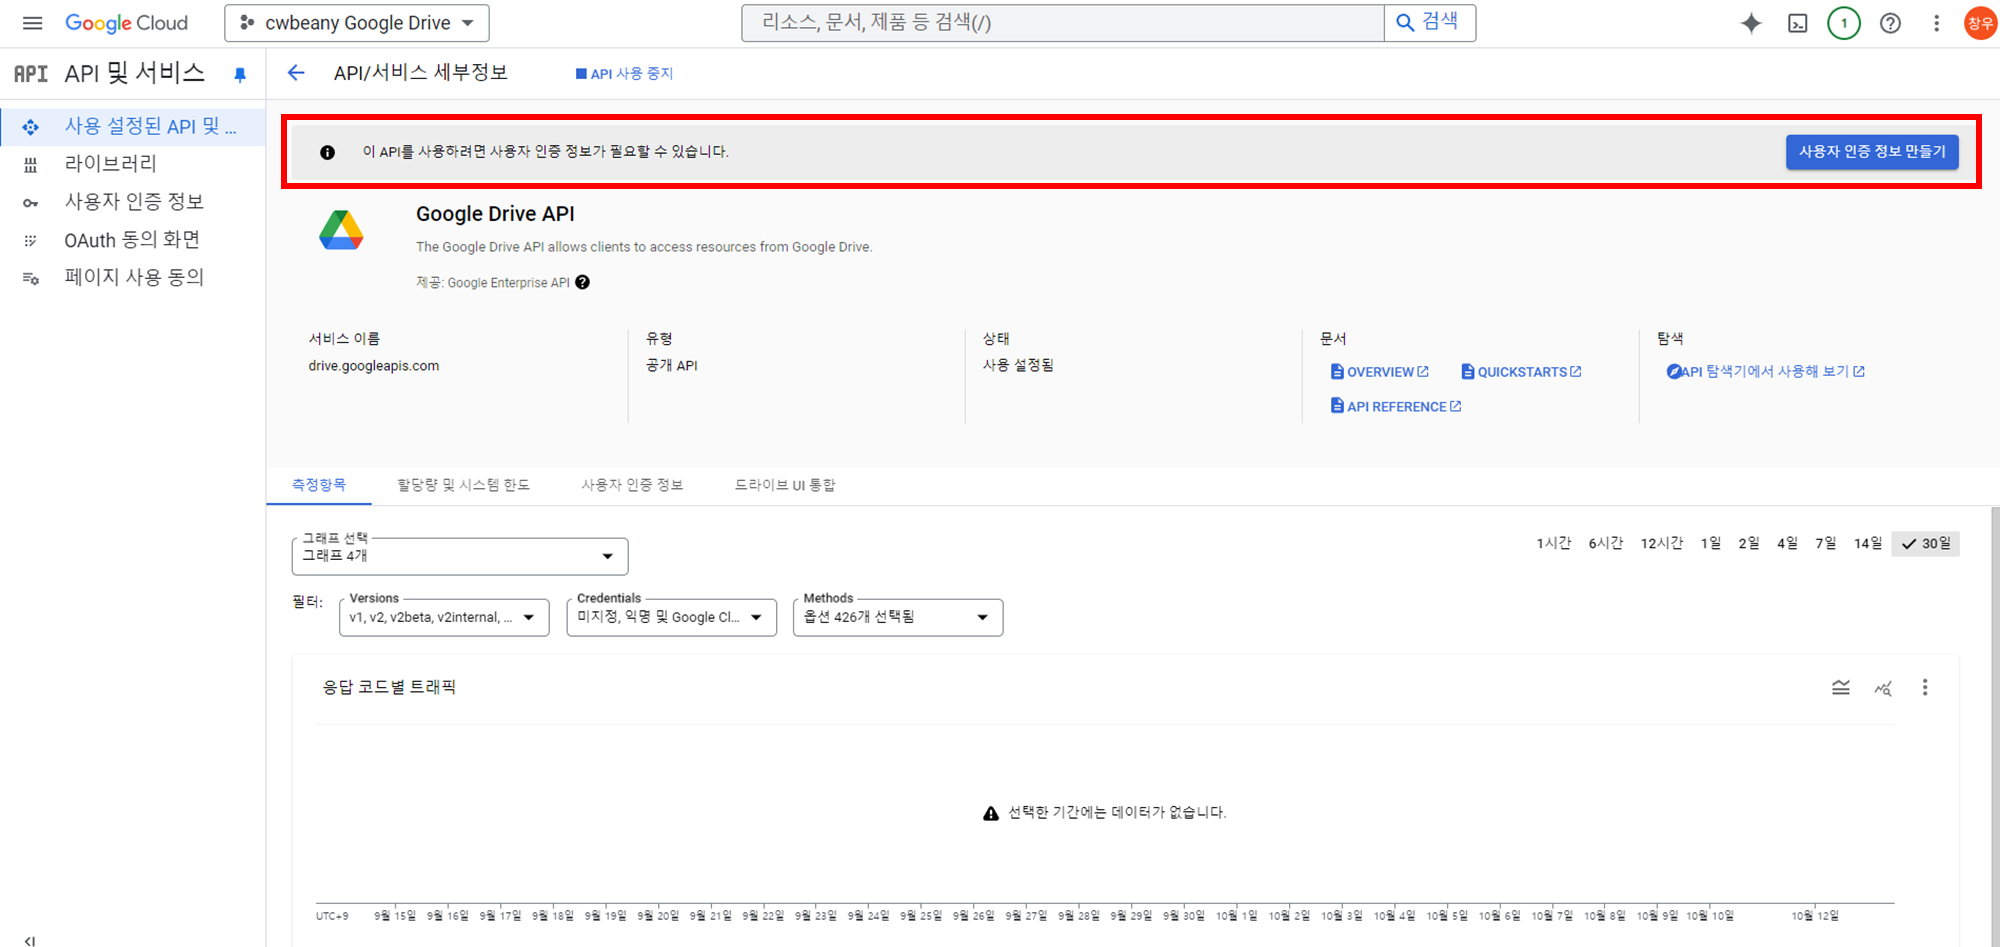
이제 이 API를 사용하려면 사용자 인증 정보가 필요하므로, 사용자 인증 정보를 생성합시다.
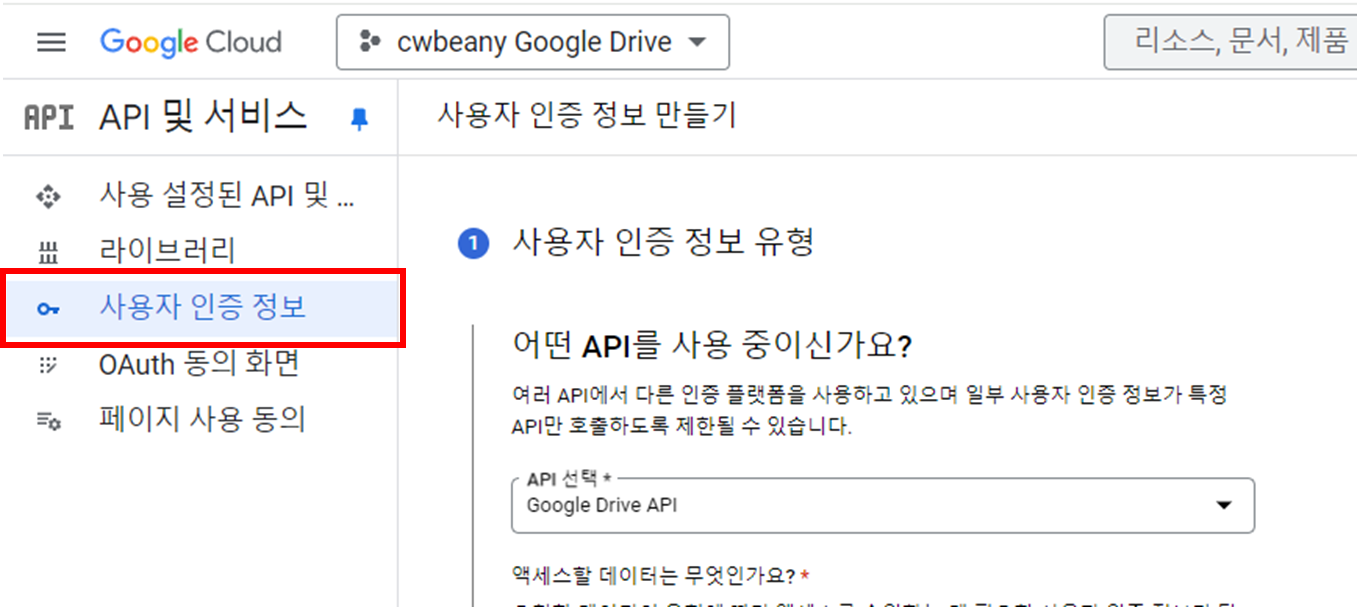

3. 사용자 인증 정보 설정
API를 Google Drive API로 설정하고, 애플리케이션 데이터로 설정합니다. 이렇게 설정하는 이유는 파일을 저장하기 위한 목적이기 때문에 사용자의 데이터 접근이 필요하지 않기 때문입니다.
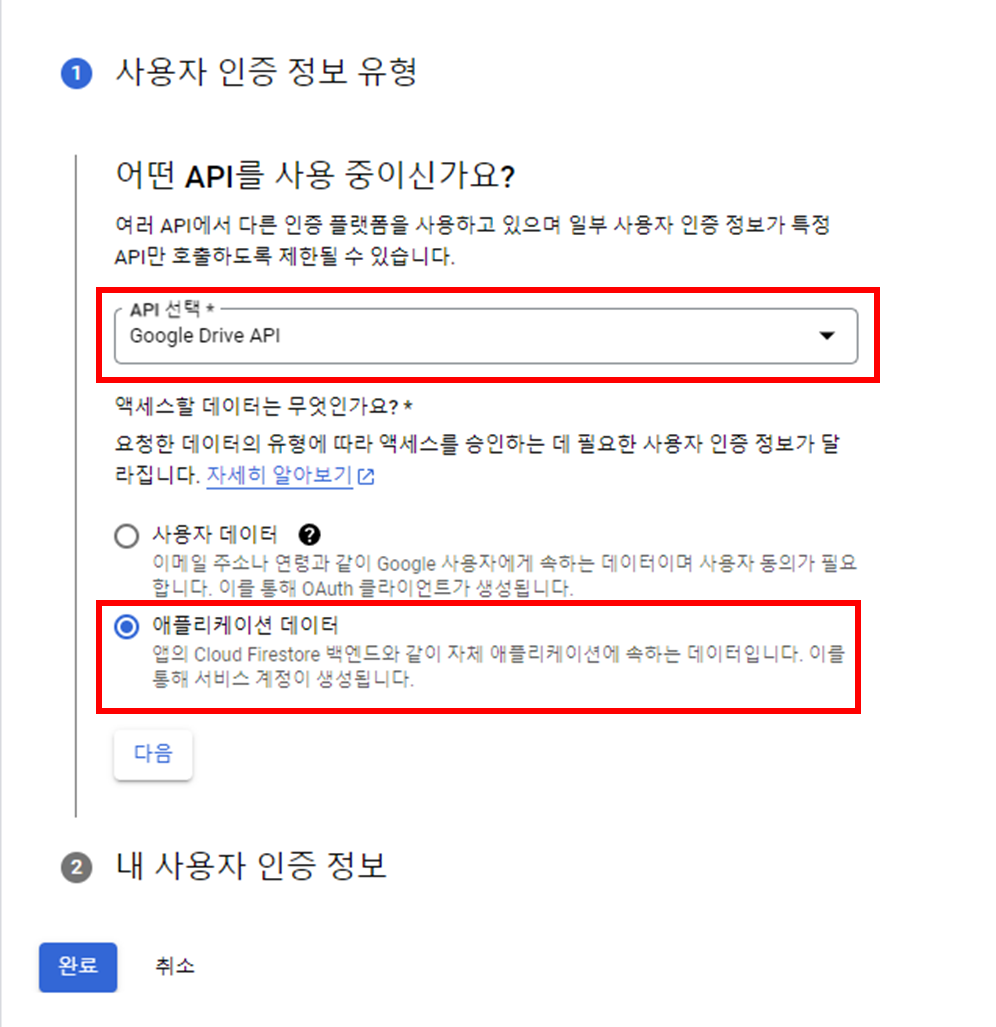
서비스 계정의 세부 정보를 설정합니다.
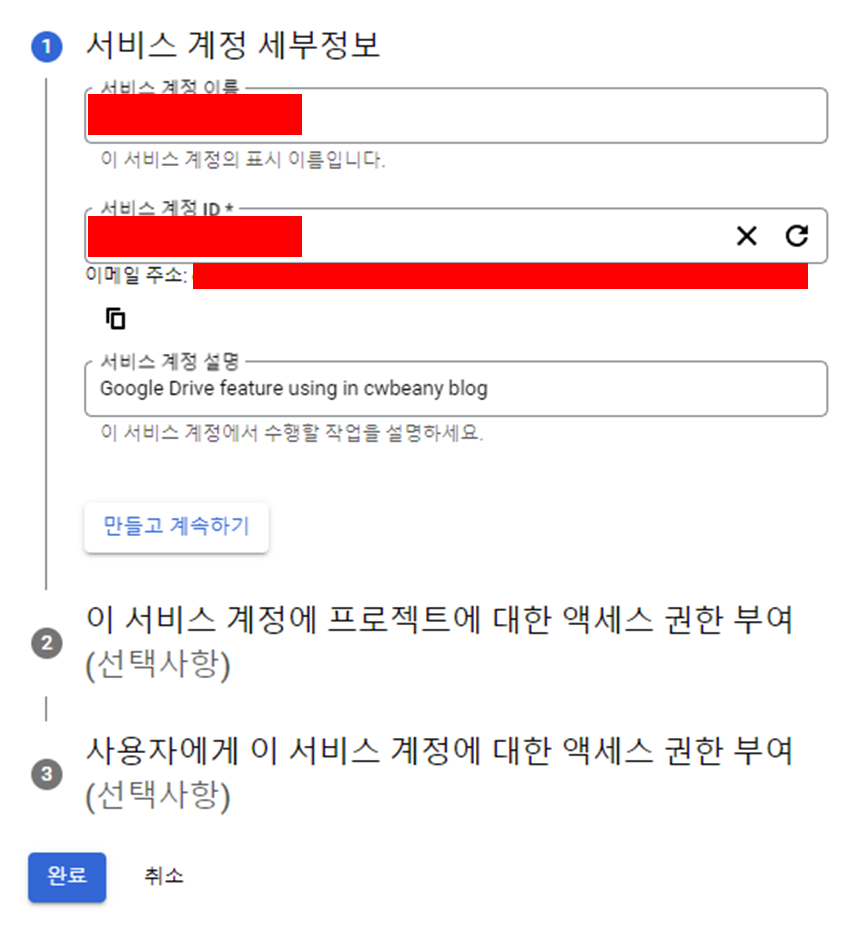
완료 클릭
생성한 서비스 계정에서 키 탭으로 이동하여 새로운 키를 생성합니다.
이 키는 서버에 저장할 예정이며, 이를 통해 서비스 계정 권한을 부여할 것입니다.

JSON 형태로 비공개 키를 생성합니다.
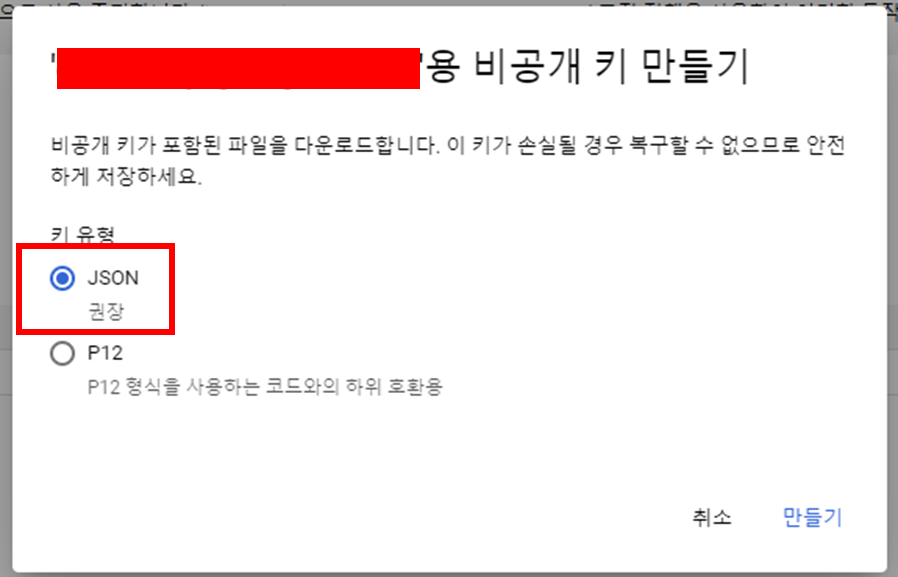
만들어진 파일을 잘 저장합니다.
4. Google Drive에 데이터 저장용 폴더 생성
폴더를 생성합니다.
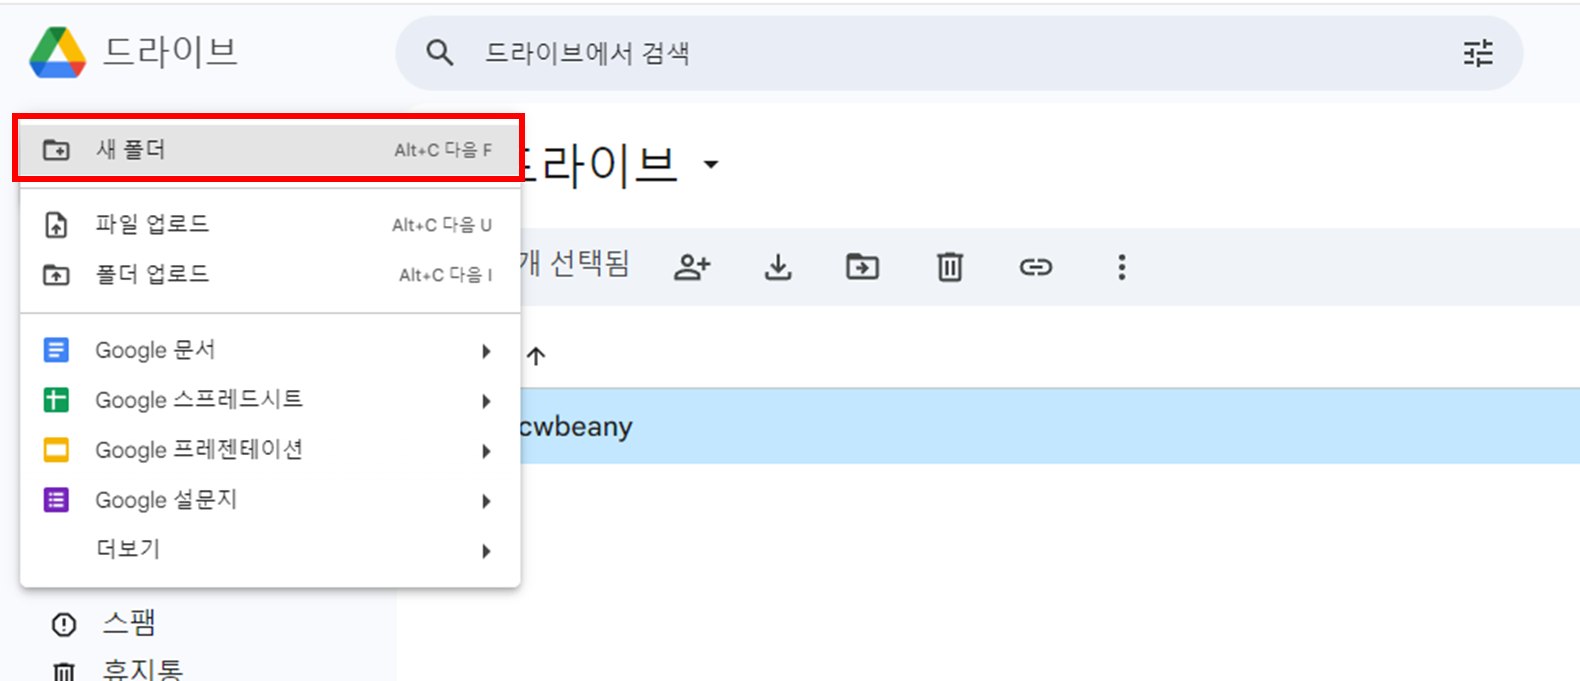
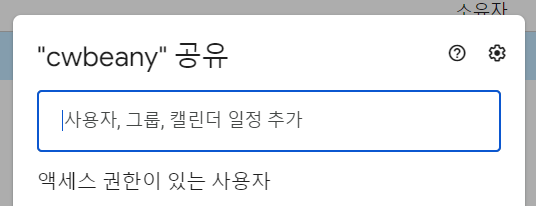
만든 폴더를 공유합니다.
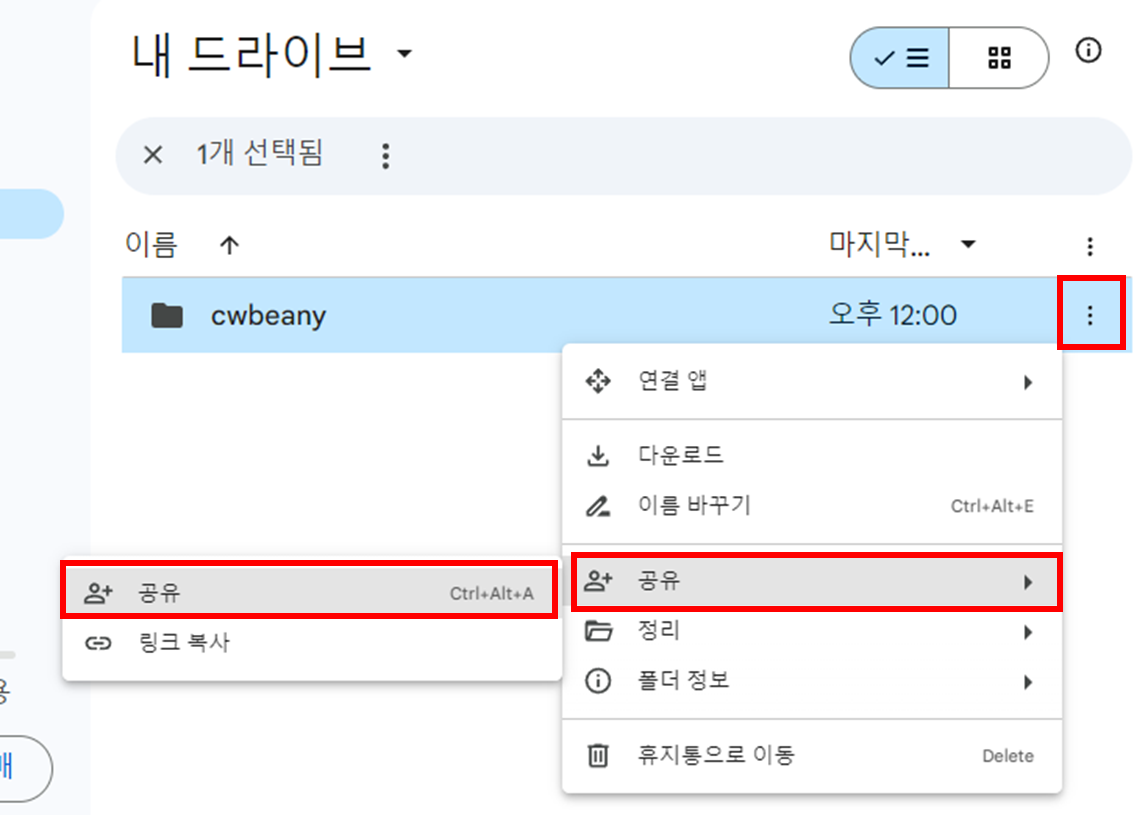
위에 권한을 주기 위해 만들어진 서비스 계정 세부 정보의 주소(3. 사용자 인증 정보 설정 참고)를 넣습니다.
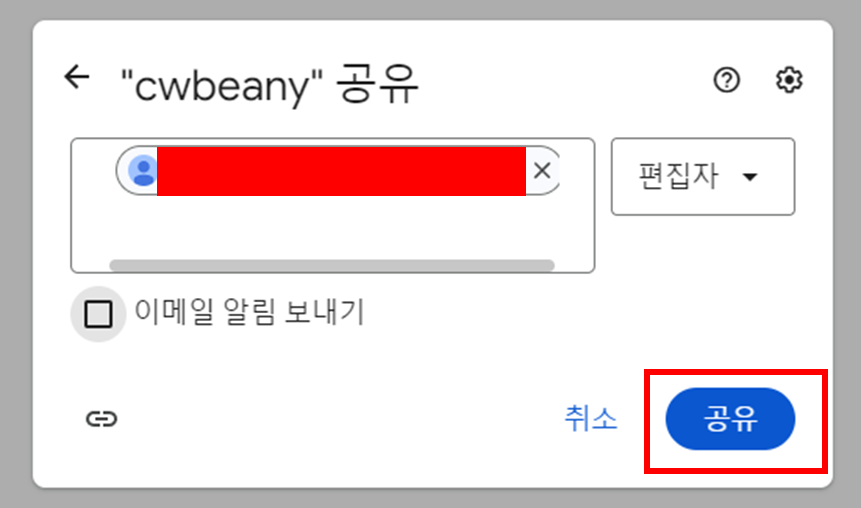
공유합니다.
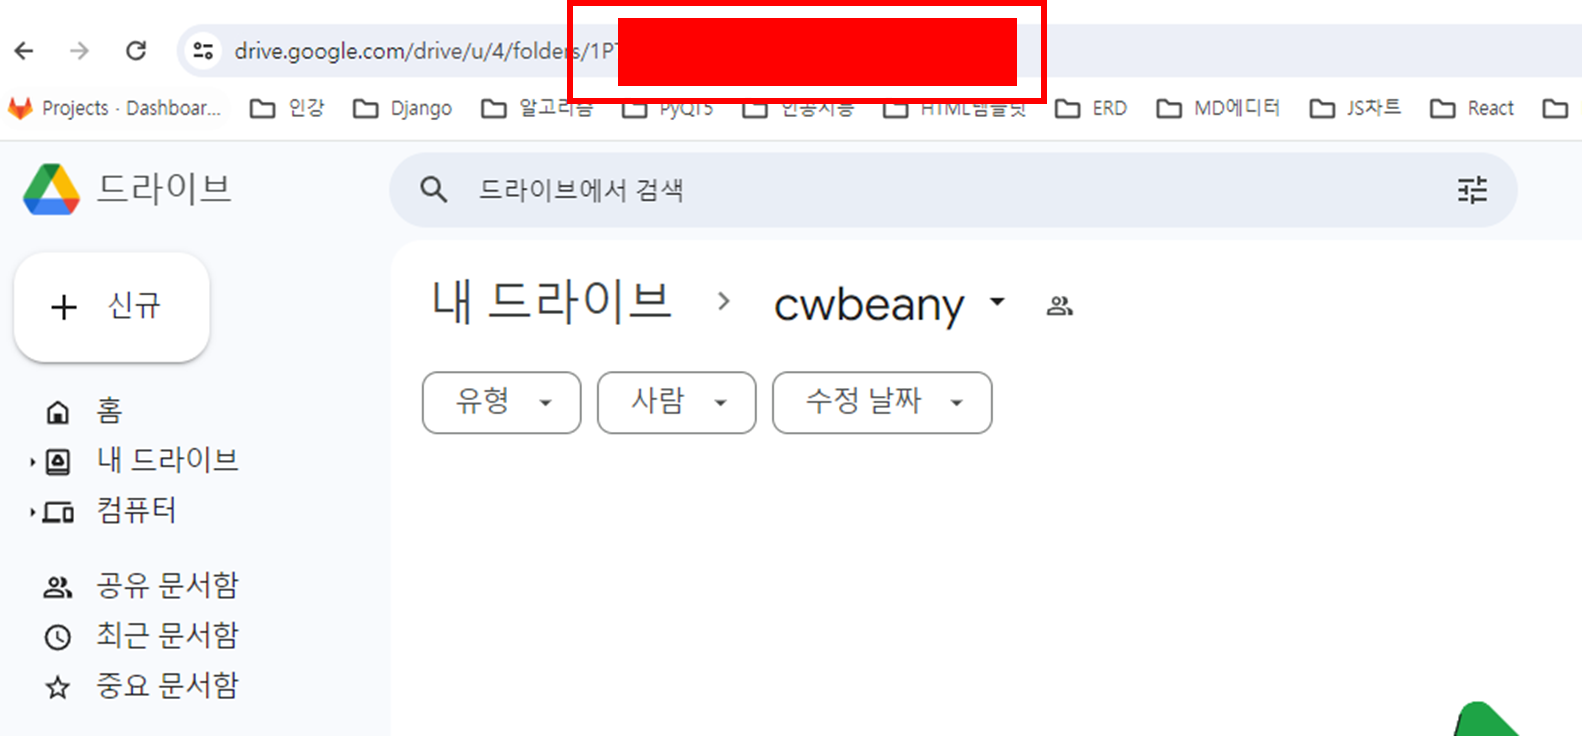
이제 해당 폴더에 들어가서 주소 folders 뒤에 있는 정보를 복사합니다.
5. 로직 구현을 위한 의존성 라이브러리 설치 및 코드 구현
pip install google-api-python-client google-auth google-auth-oauthlib google-auth-httplib2
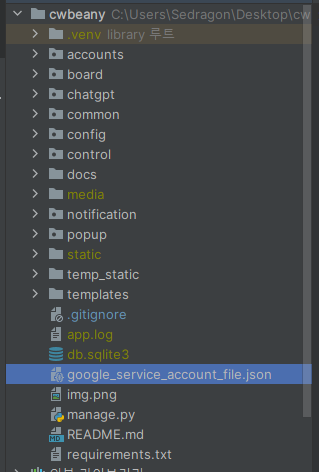
google_service_account_file.json 이라는 프로젝트 root 쪽에 만들었습니다.
이 폴더 안에는 사용자 정보 json 내용을 붙여넣습니다.(3. 사용자 인증 정보 설정 부분에 다운로드 받은 파일)
그 후, settings.py 파일에 GOOGLE_SERVICE_ACCOUNT_FILE 와 GOOGLE_API_SCOPES 를 정의합니다.
(settings.py 에 정의하는 건 상수를 정의하는 거라고 생각하시면 됩니다)
GOOGLE_SERVICE_ACCOUNT_FILE = os.path.join(BASE_DIR, 'google_service_account_file.json')
GOOGLE_API_SCOPES = [
    'https://www.googleapis.com/auth/drive',
]
기존에 만들었던 google_drive_utils.py 안에 로직을 추가합니다.
from typing import List

from google.oauth2.service_account import Credentials
from googleapiclient.discovery import build
from googleapiclient.http import (
    MediaFileUpload,
    MediaIoBaseUpload,
)


class GoogleDriveServiceGenerator:
    def __init__(self, account_file_path: str, scopes: List[str]):
        self.account_file_path = account_file_path
        self.scopes = scopes

    def generate_service(self):
        creds = Credentials.from_service_account_file(
            filename=self.account_file_path,
            scopes=self.scopes,
        )
        service = build('drive', 'v3', credentials=creds)
        return service


class GoogleDriveService:
    def __init__(self, service):
        self.service = service

    def get_file_list(self, query: str, page_size: int = 1000) -> List[dict]:
        results = self.service.files().list(
            q=query,
            pageSize=page_size,
            fields="nextPageToken, files(id, name, mimeType)"
        ).execute()
        items = results.get('files', [])
        return items

    def upload_file_by_file_path(self, file_name: str, upload_target_file_path: str, upload_drive_folder_target: str) -> str:
        file_metadata = {
            'name': file_name,
            'parents': [upload_drive_folder_target]
        }
        media = MediaFileUpload(upload_target_file_path, mimetype='application/octet-stream')
        file = self.service.files().create(body=file_metadata, media_body=media, fields='id').execute()
        return file.get('id')

    def upload_file_by_file_obj(self, file_obj, upload_drive_folder_target: str) -> str:
        file_metadata = {
            'name': file_obj.name,
            'parents': [upload_drive_folder_target]
        }
        media = MediaIoBaseUpload(file_obj, mimetype='application/octet-stream')
        file = self.service.files().create(body=file_metadata, media_body=media, fields='id').execute()
        return file.get('id')

    def delete_file(self, file_id: str):
        self.service.files().delete(fileId=file_id).execute()
6. 코드 실행
from common.common_utils.google_utils.google_drive_utils import GoogleDriveService, GoogleDriveServiceGenerator
from django.conf import settings
import os

file_path = os.path.join(settings.BASE_DIR, 'google_service_account_file.json')

google_drive_service = GoogleDriveService(
    service=GoogleDriveServiceGenerator(
        settings.GOOGLE_SERVICE_ACCOUNT_FILE,
        settings.GOOGLE_API_SCOPES,
    ).generate_service()
)
google_drive_service.upload_file_by_file_path(
    file_name='test_aaaaaaa.json',
    upload_target_file_path=file_path,
    upload_drive_folder_target=settings.GOOGLE_DRIVE_MEDIA_BACKUP_FOLDER_ID,
)
'XXXXXXXEXAMPLEIDXH8V'
성공적으로 업로드 됐습니다~!

내용을 확인해보니 정상적으로 잘 올라가는 것도 확인했습니다~!